
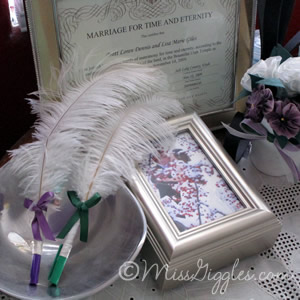
When we got married we had feathered pens at our reception for people to use two write some advice on our guest cards that took the place of a guest book. Those pens were extremely important to Brett, particularly the feather part. Important because he knew I wanted him to have an opinion on things so he chose the pens as one of those things. I needed any pens we used to be acid free and since I couldn’t find any feathered pens in the store that said they were, I decided that just meant I’d have to make our own. So here’s how I did it.
Supplies:
- Acid-free pens – We used Staedtler triplus fineliner pens because we could get them in colors resembling our wedding colors and they don’t dry out if a guest leaves the cap off (which is always a possibility). Plus they’re just plane nice to write with. If I had a talk show and did an episode about my favorite things, everyone in the audience would get a set of Staedtler pens.
- Ribbon – I used white to wrap the pen and then colored ribbon for a bow to help indicate pen color.
- A way to seal the ribbon – I use a wood burning tool to heat seal the ends of all the ribbon we used for our wedding (and we used a lot). You can also use plain old fire or other things as well.
- A feather – Because without it we wouldn’t have a feathered pen. Ostrich feathers and others can be found at most craft stores.
- Scissors
- Glue gun – No craft project is complete unless you’ve burned at least one finger with a glue gun.
- Band-aids – For that finger you’re going to burn.
- Chocolate – I’ve discovered that all projects go better when chocolate is included on the list of supplies.
Steps:
- Seal one end of the ribbon and wrap the pen in ribbon. This can be a little tricky because you need it to go flat at the top and bottom, but also angle along the body. Tack it down with a bit of glue and work with it for a while. Start at the writing end so that the ribbon ends will be covered at that end. I found I only needed to glue it at the top and bottom. And if you start and realize it isn’t working right, it pulls off easy so you can start again. Seal the other end of the ribbon after getting it wrapped all around.
- Eat some chocolate and put a band-aid on the finger you burned.
- Trim the feather so it’s not insanely tickle-your-nose-as-you-write long. The feathered pens in the stores have super short pens to allow for the length of the feather to be the bulk of the length of the writing instrument. I trimmed our feathers down just a bit and cut off the part that didn’t have any feathery stuff on it.
- Eat some chocolate while you realize the feathery bits you just trimmed off are not going to be easy to clean up and are now all over your lap.
- Starting about the middle of the pen put glue running to the end of the pen and attach the feather.
- Wrap a colored ribbon around the pen at the base of the feather and tie a bow to cover the end of the feather and help indicate what color the pen is.
- Eat some chocolate and feel fancy while writing with your feathered pen.
I still use these pens for writing important things in my journal, like the stories of our kids’ births. They’re kind of fun to have around.
 I am an educator and PhD. I quilt, belly dance, run, read, and try to grow things. I am a Mormon. I am infertile. I am a daughter, sister, aunt, grand-daughter, friend, wife, and mom.


And thus continued your Pinterest-inspiring life.
I have a gut feeling the steps could have been reduced by two or three though…
:brett:
I’m so glad you still use these pens!